
Using only a Windows PC or laptop, anyone can broadcast live audio over the internet so that others can stream it back on their phones, laptops, and other devices. This guide will teach you how to get started broadcasting live audio online. These broadcasts can be used for radio stations, original music, live events, speeches, ceremonies, and so much more.
Background
To help you make better use of this guide, let's go over some jargon first. Feel free to skip this section if you don't need a deeper understanding of what we're setting up.
Audio Stream — In order to broadcast live audio online, we first have to create an audio stream. An audio stream is a special URL where you can send your audio to enable others to listen to it. You broadcast audio to that URL using a streaming audio encoder.
Streaming Audio Encoder — A streaming audio encoder is a software application (or a hardware box) that captures audio, compresses it, and broadcasts that audio across the internet. It takes audio you can hear, encodes it to a codec (for example MP3, AAC, or Ogg Vorbis) and sends it out to a streaming server which hosts your audio stream. If you want to know more about audio codecs, check out our blog post.
Streaming Server — A streaming server powers your audio stream URL. The server rebroadcasts your live audio to any listeners that try to listen to that URL in their web browser or media players.
Next Steps — This guide will show you how to create a stream, broadcast to it with a streaming audio encoder, and finally get a stream URL to share directly with listeners or embed in a website with our Embedabble Player. In the example below, we will use Rocket Broadcaster as our streaming audio encoder and Radio Mast will host our stream URL for us.
Rocket Broadcaster was built to work seamlessly with Radio Mast, so it is our recommended encoder software for getting up and running quickly.
Prerequisites
There are few things we need to get started streaming audio online:
- A Windows PC or laptop
- Optional: A microphone
- Rocket Broadcaster - Free streaming audio encoder software (free download)
- A Radio Mast account (free signup)
Before you continue, be sure you download and install Rocket Broadcaster, and sign up for a Radio Mast account.
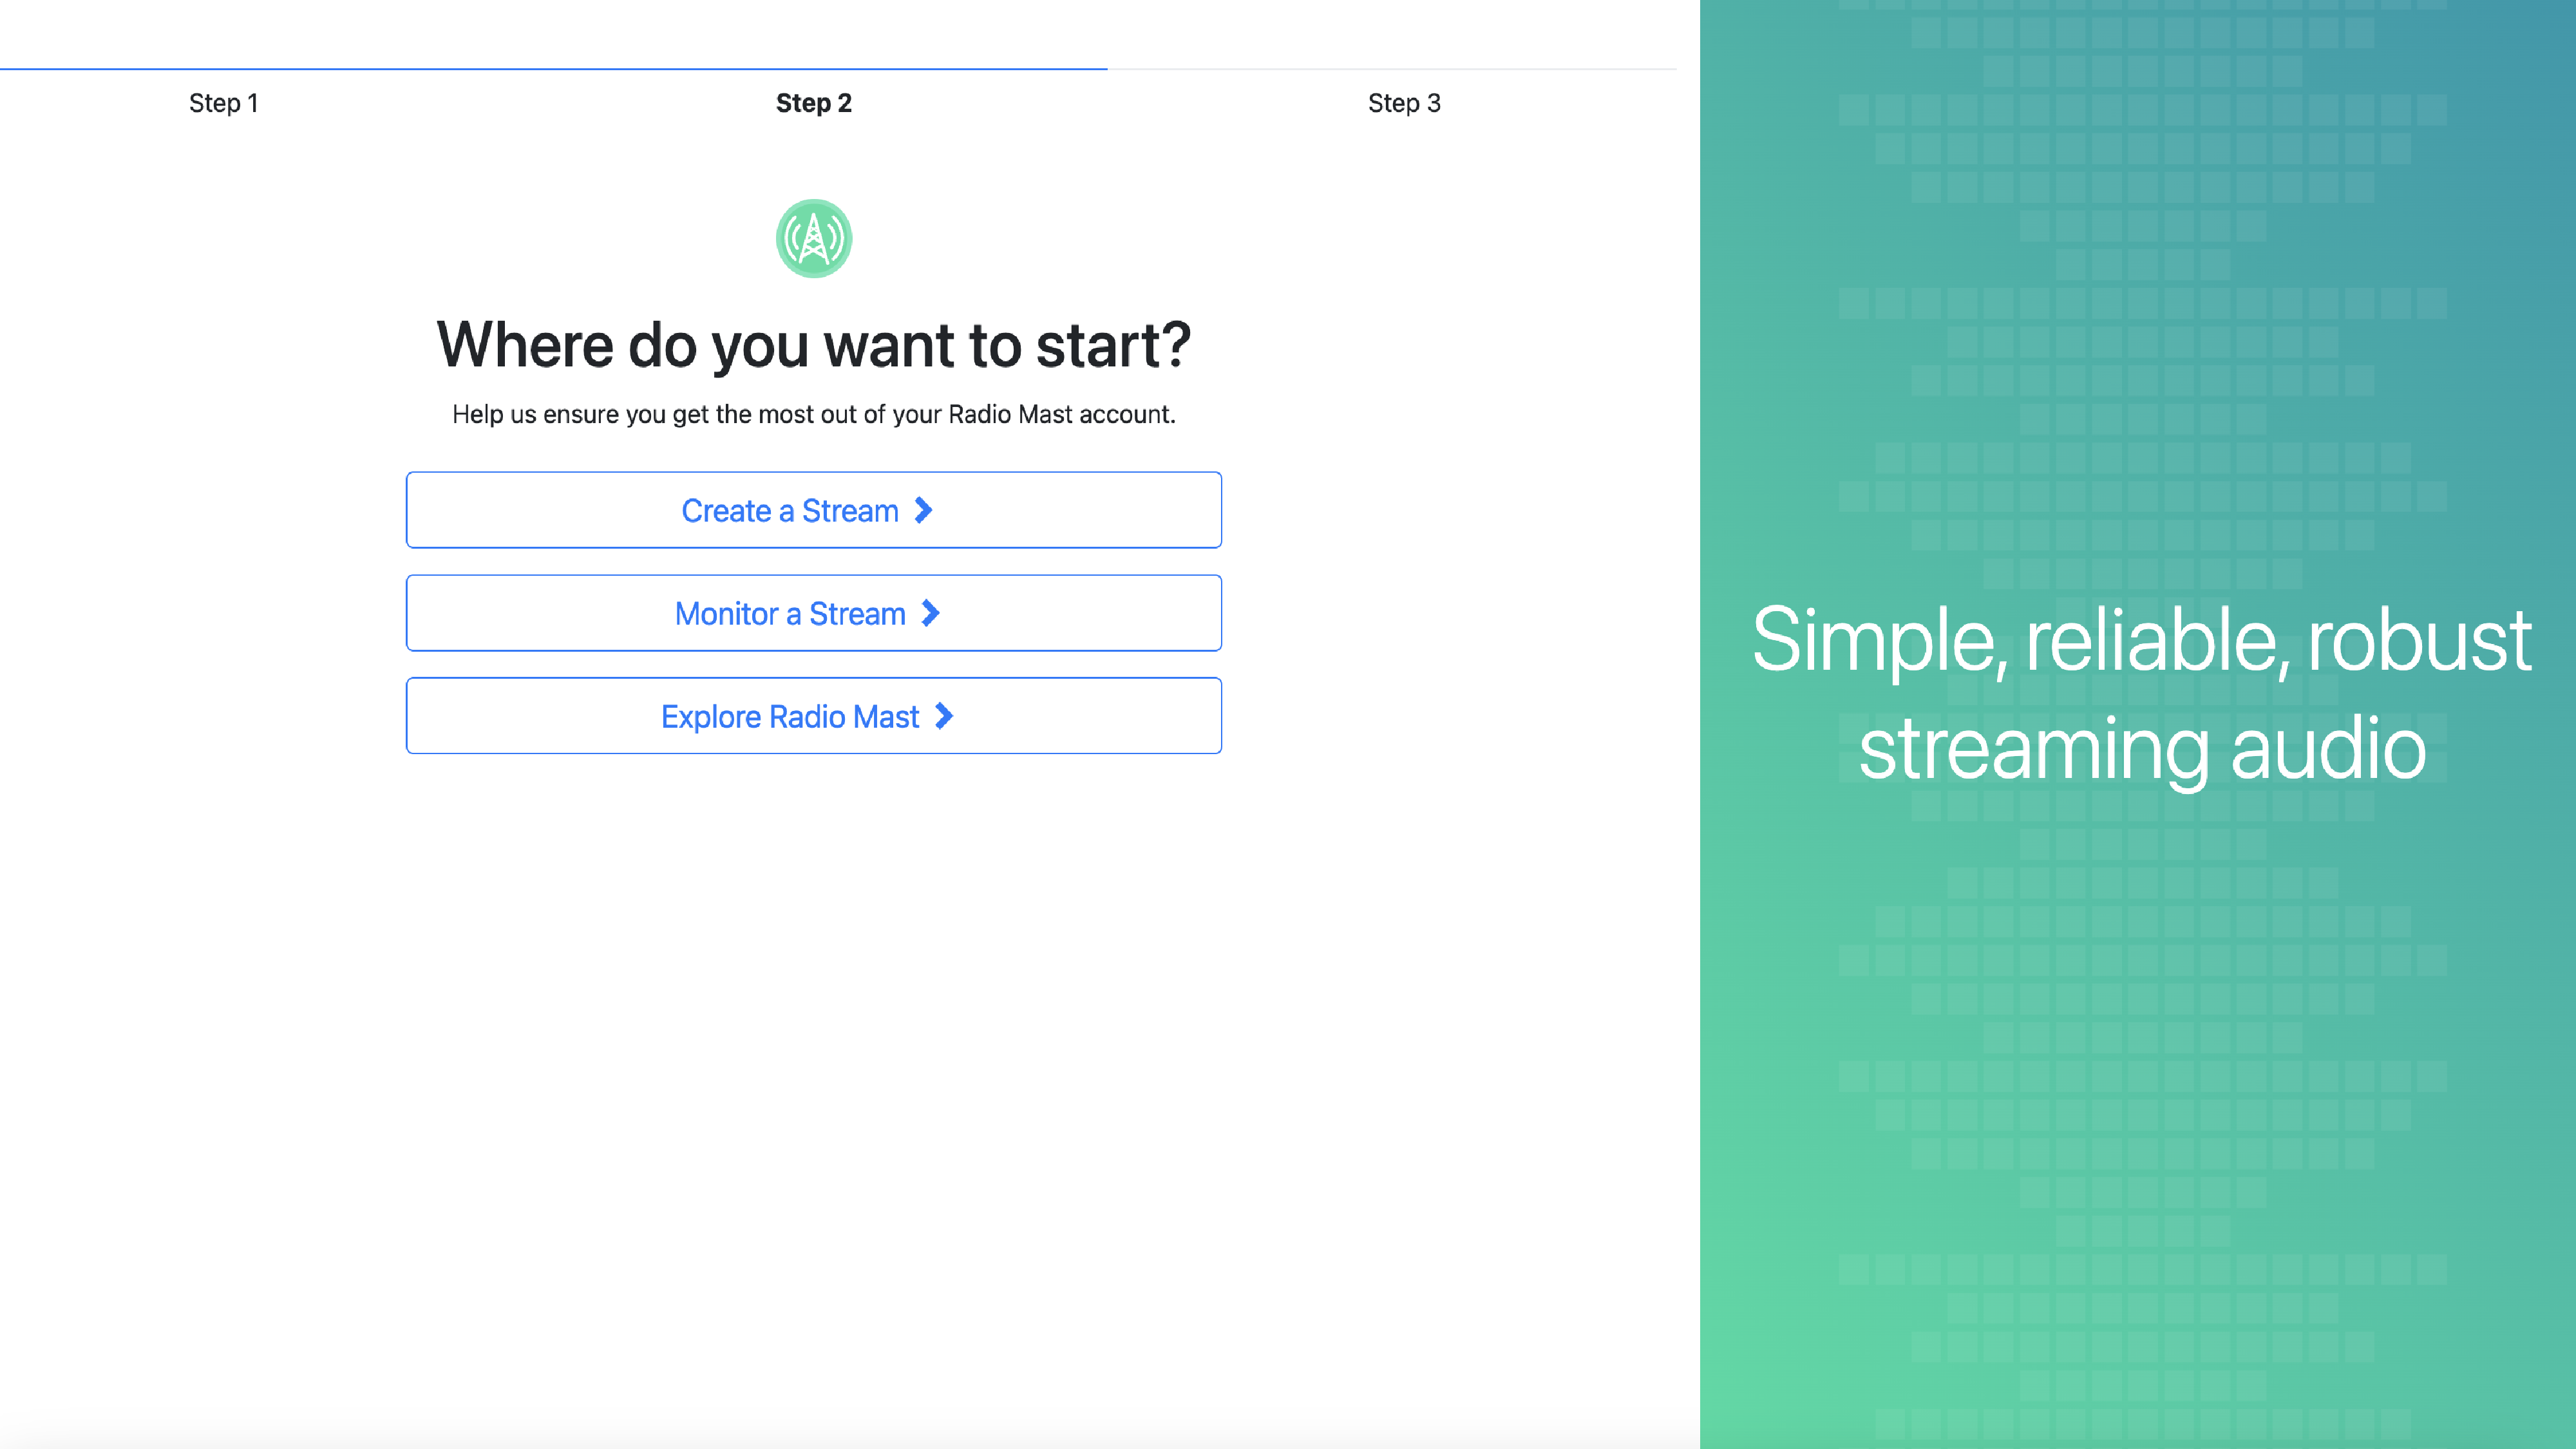
Sign up and Create a Stream
To get started, sign up for a Radio Mast trial. During the second step of the sign up process, click Create a Stream.
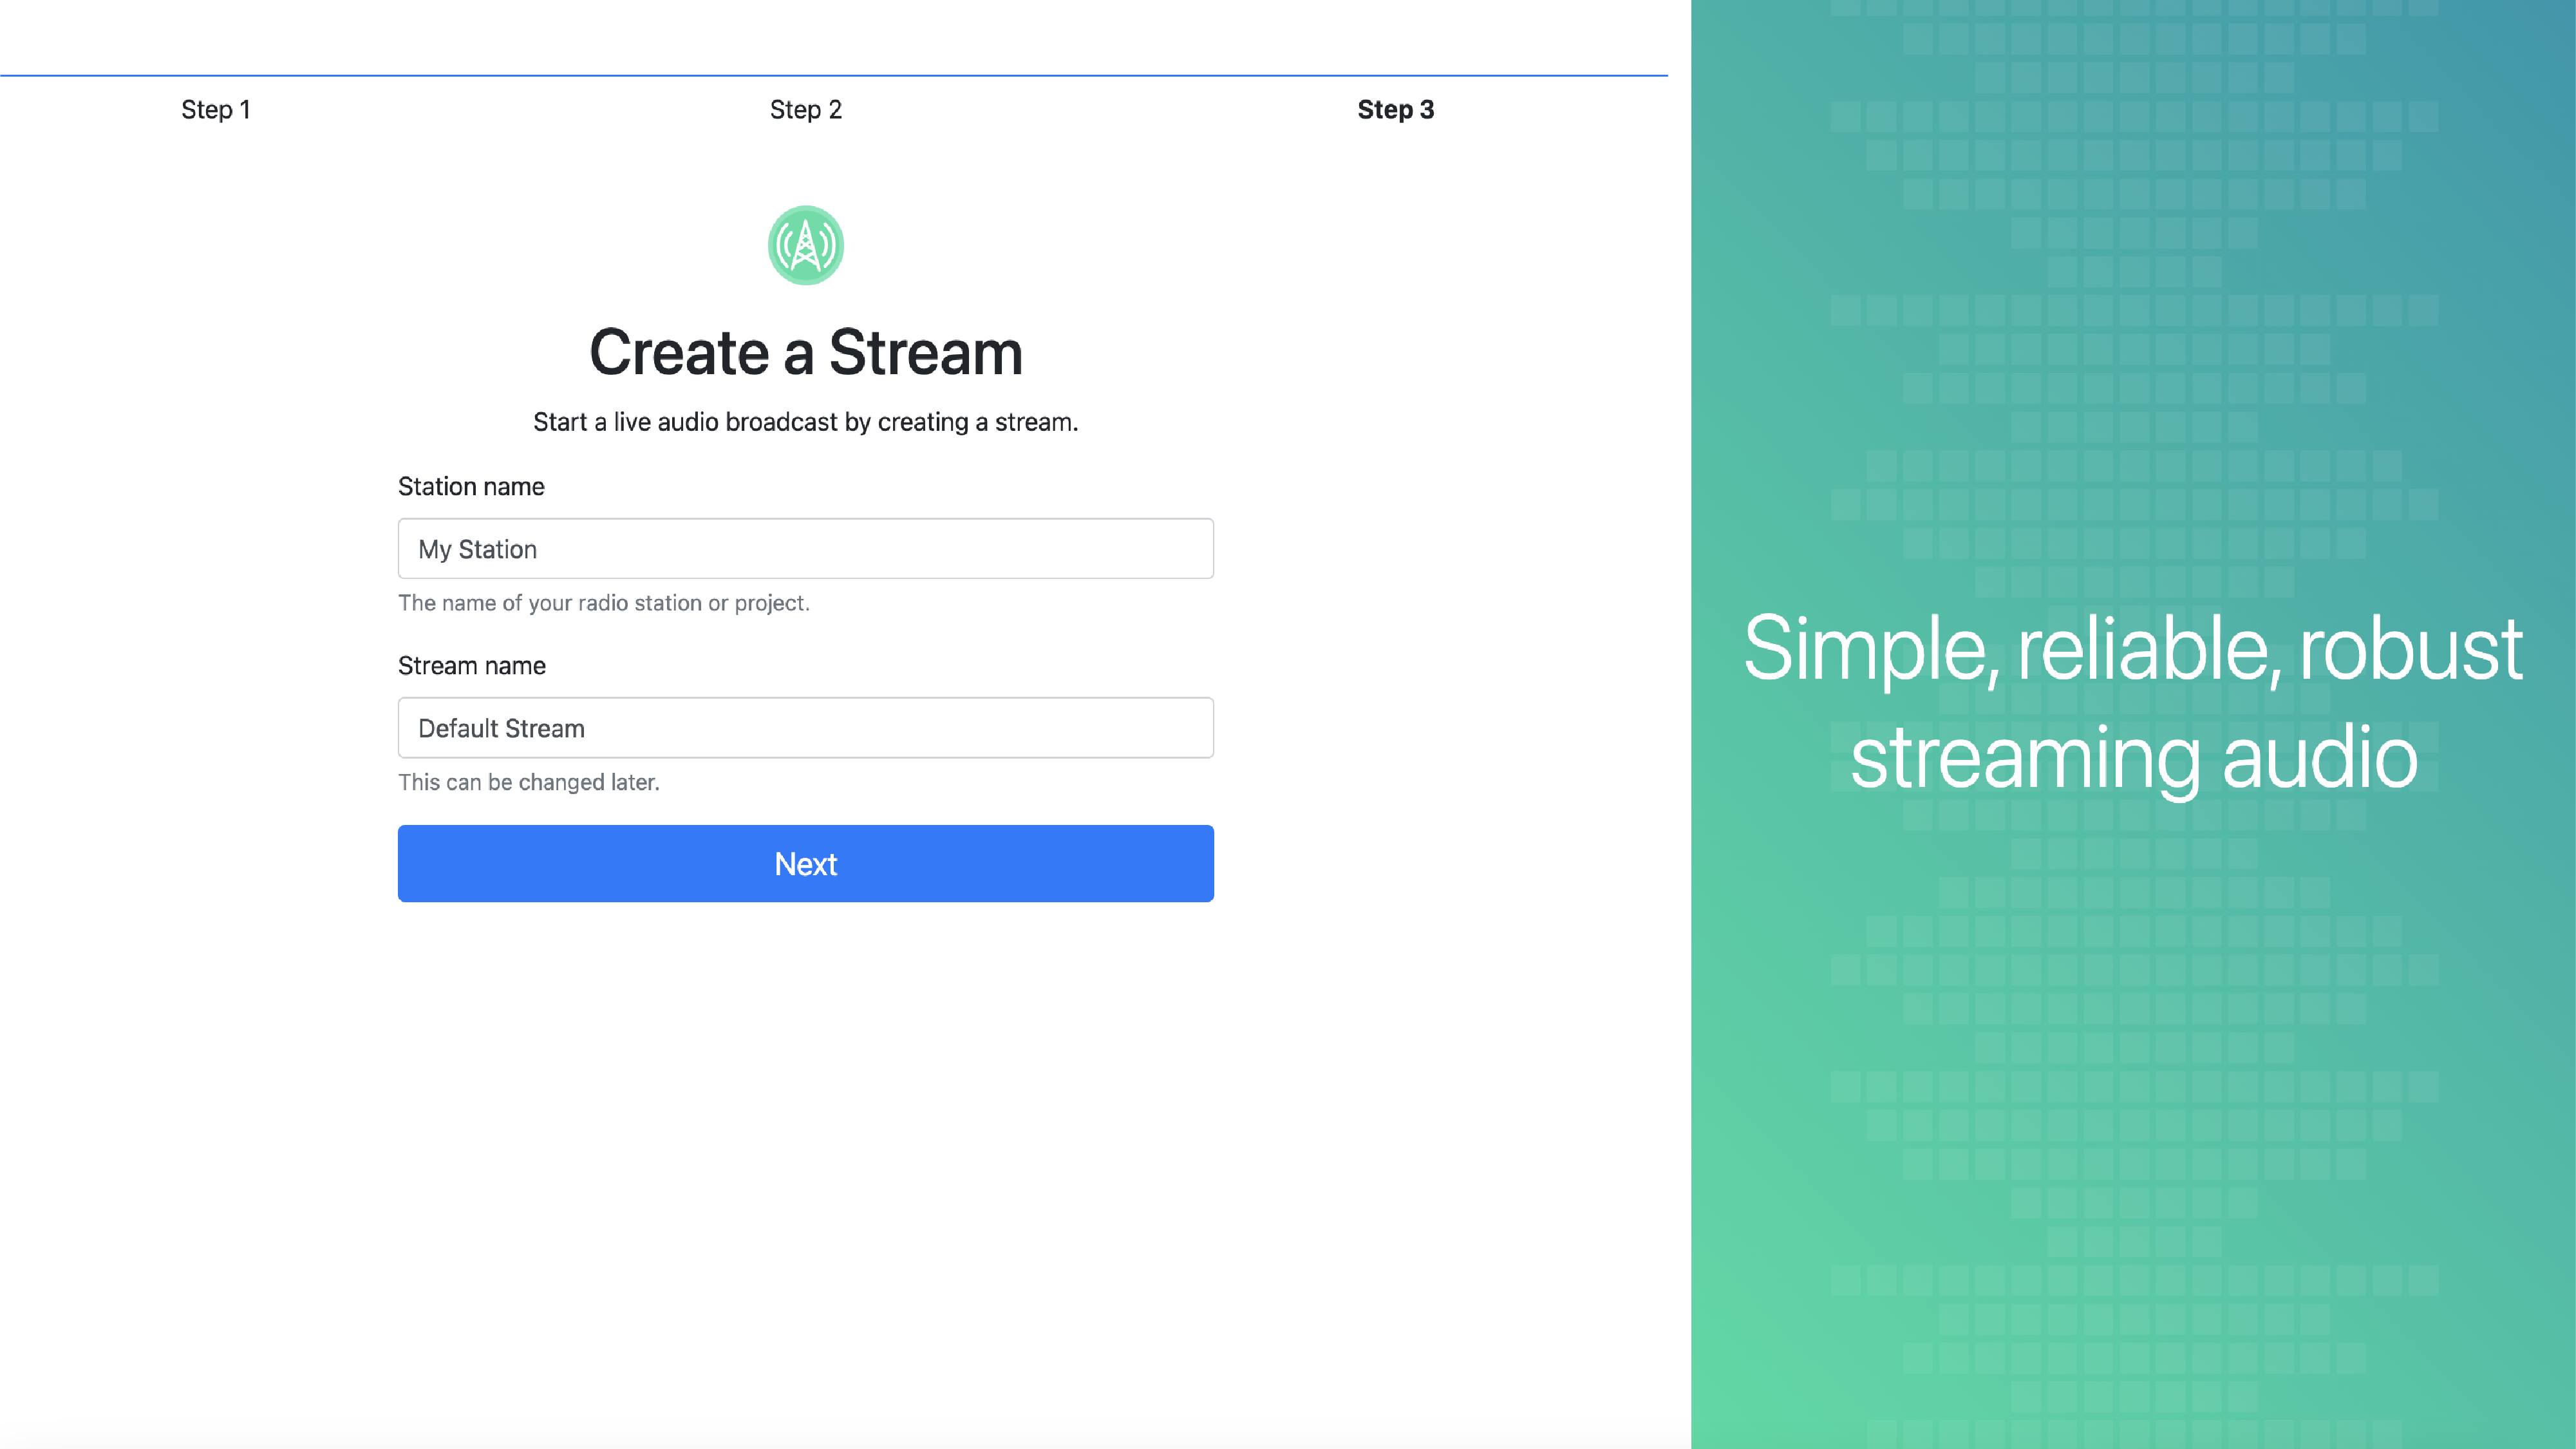
On the next screen, enter a name for your radio station. Choose a name that's related to your broadcast because this name will be visible to your listeners.
We're almost there! On the next screen, you'll be guided through the steps to get Rocket Broadcaster downloaded and set up.
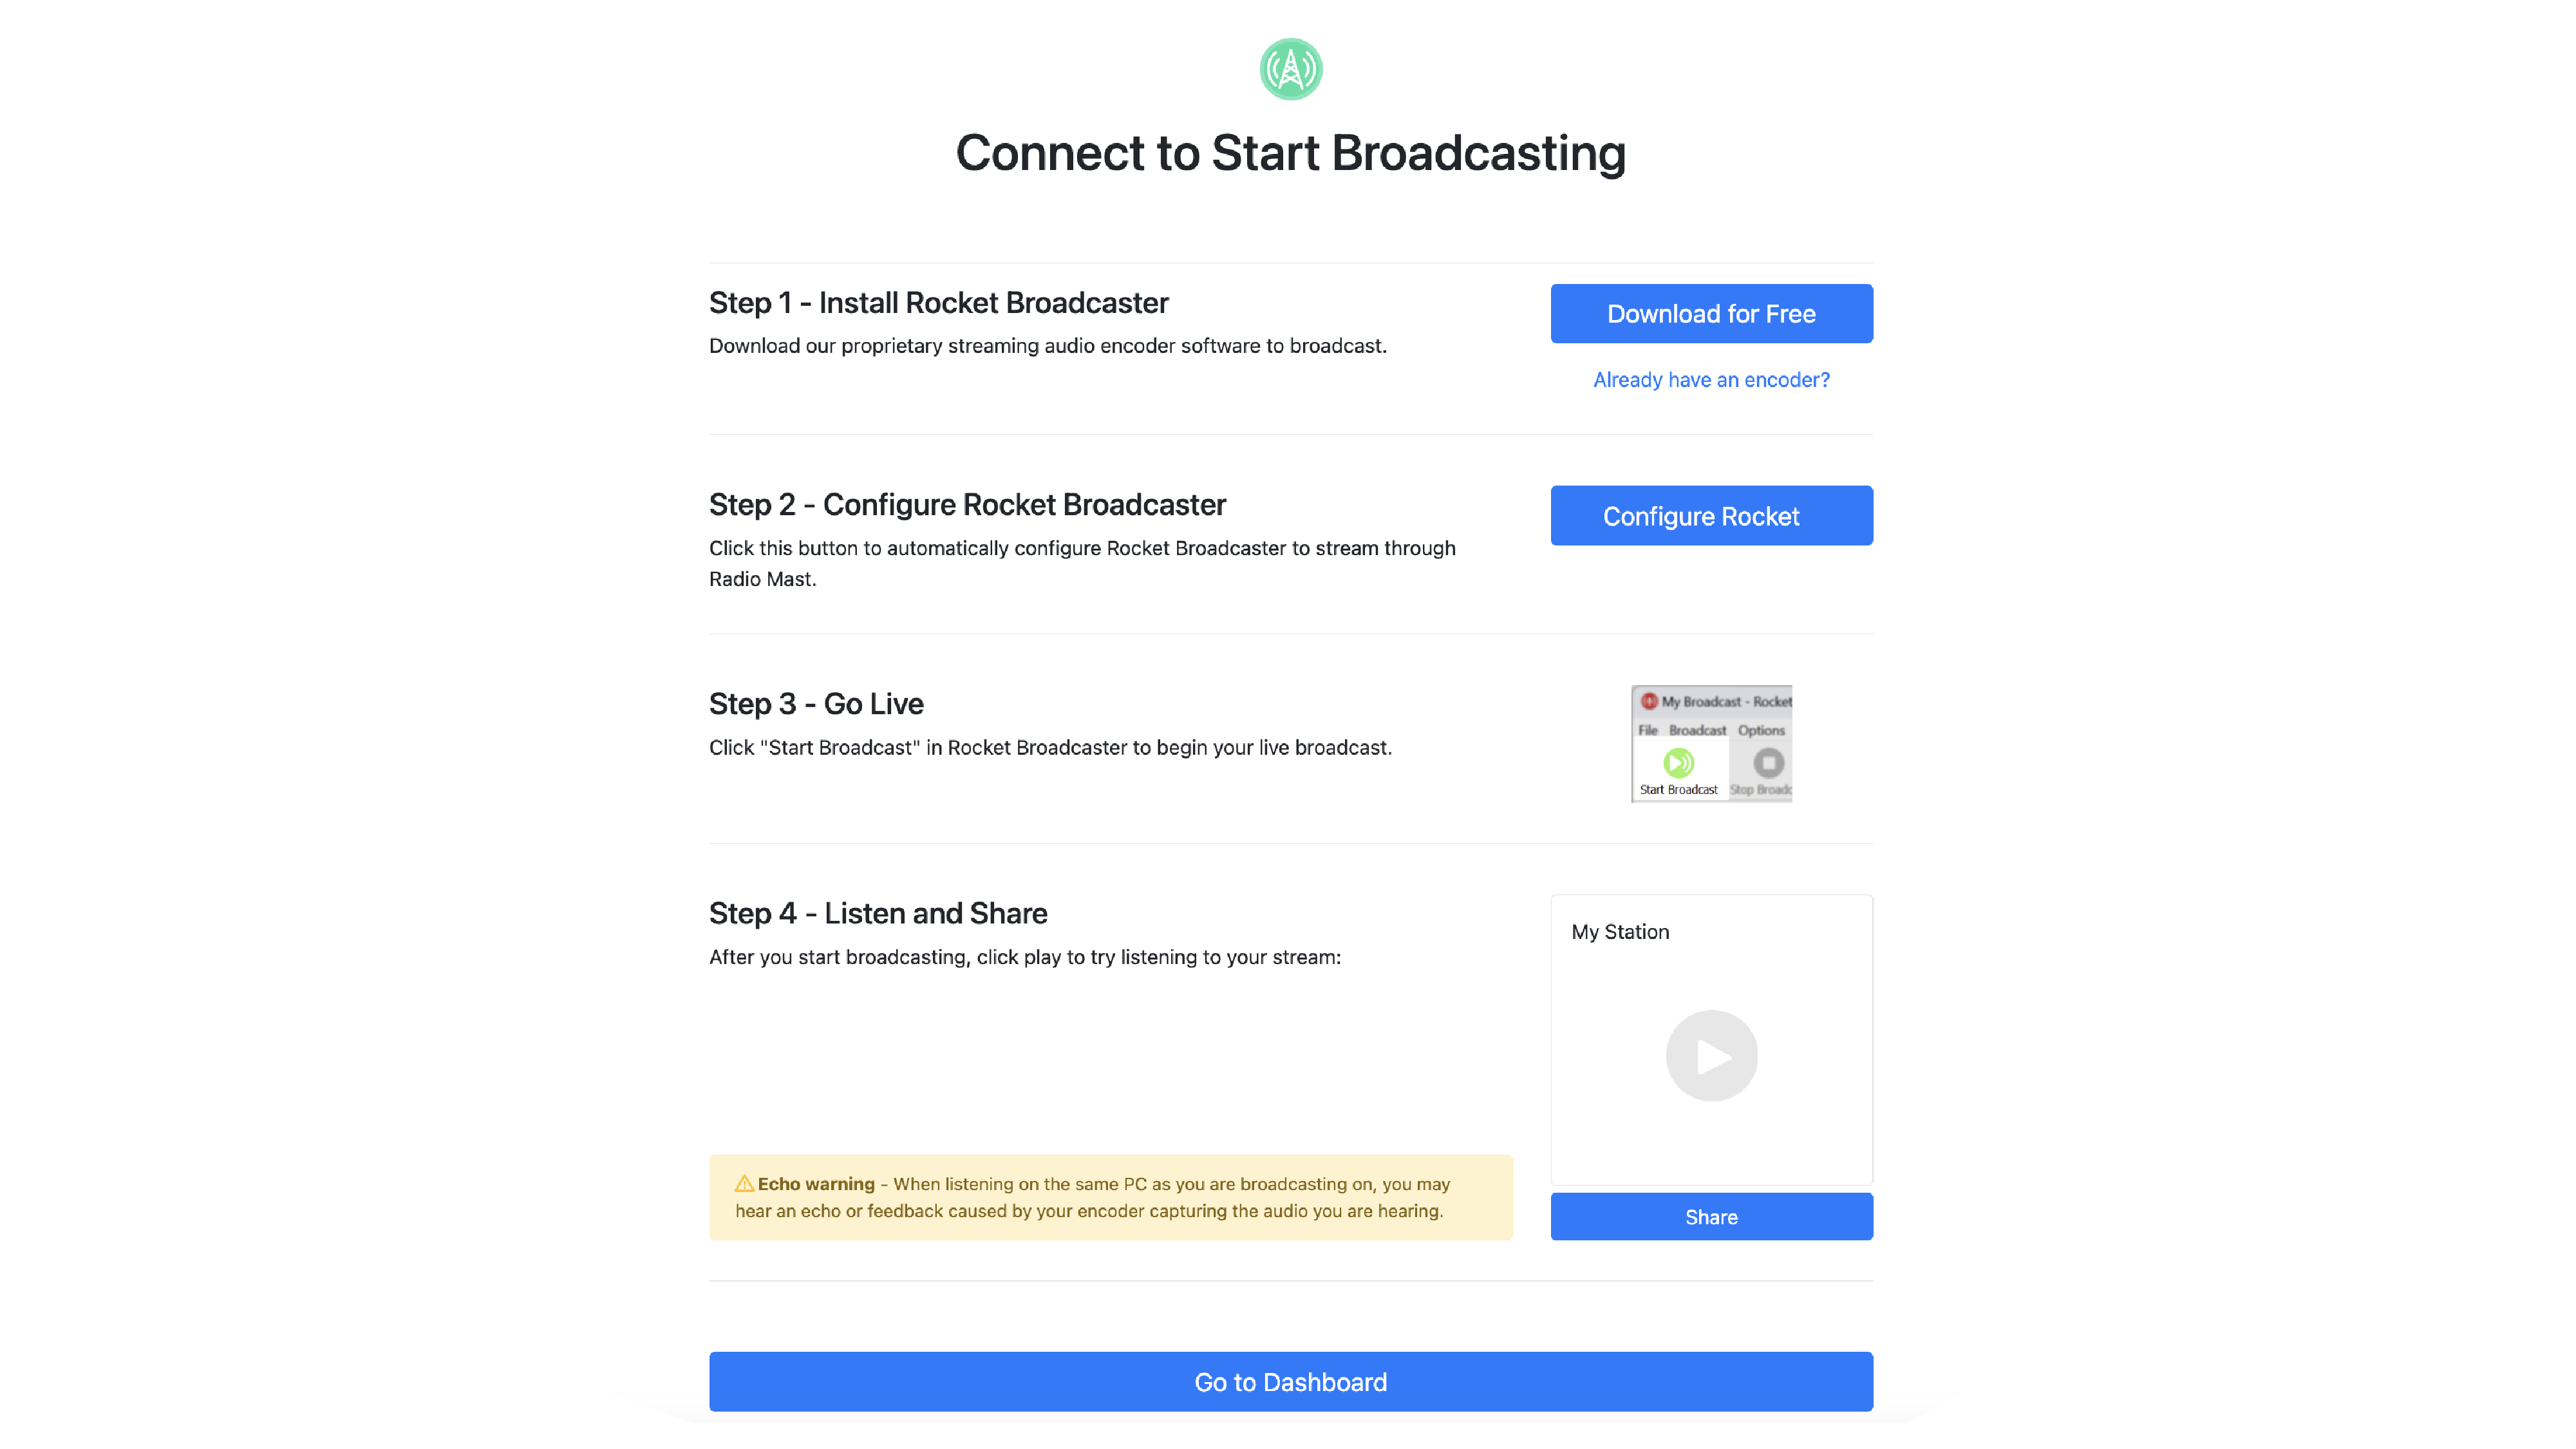
Follow the instructions presented on the page by downloading and installing Rocket Broadcaster.
Next, click "Configure Rocket" to automatically launch and configure Rocket Broadcaster. This will configure Rocket Broadcaster to be able to broadcast to your stream.
Start your Broadcast
To go live, click the "Start Broadcast" button in Rocket Broadcaster.
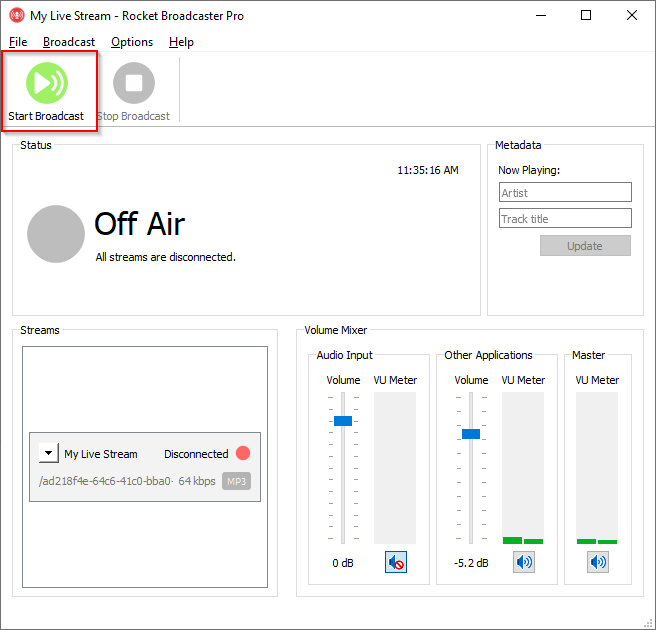
Congratulations, you're now broadcasting live audio over the internet!
Note that, by default, Rocket Broadcaster captures audio from other applications on your PC, as well as from your PC's microphone. If you only want to capture from one source, or don’t want what is playing on your browser to be broadcast (creating a feedback loop for example), you can mute a capture channel by clicking the blue speaker icon underneath the volume control. You can also configure Rocket to capture from a different audio input device by clicking Options > Preferences at the top of the Rocket Broadcaster main window.
Listen to your Stream and Embed it
Now that you are broadcasting live, click the play button back in Radio Mast to listen to your stream. Note that you may hear an echo or feedback loop after a few seconds, as Rocket Broadcaster will capture the audio you hear on your PC by default.
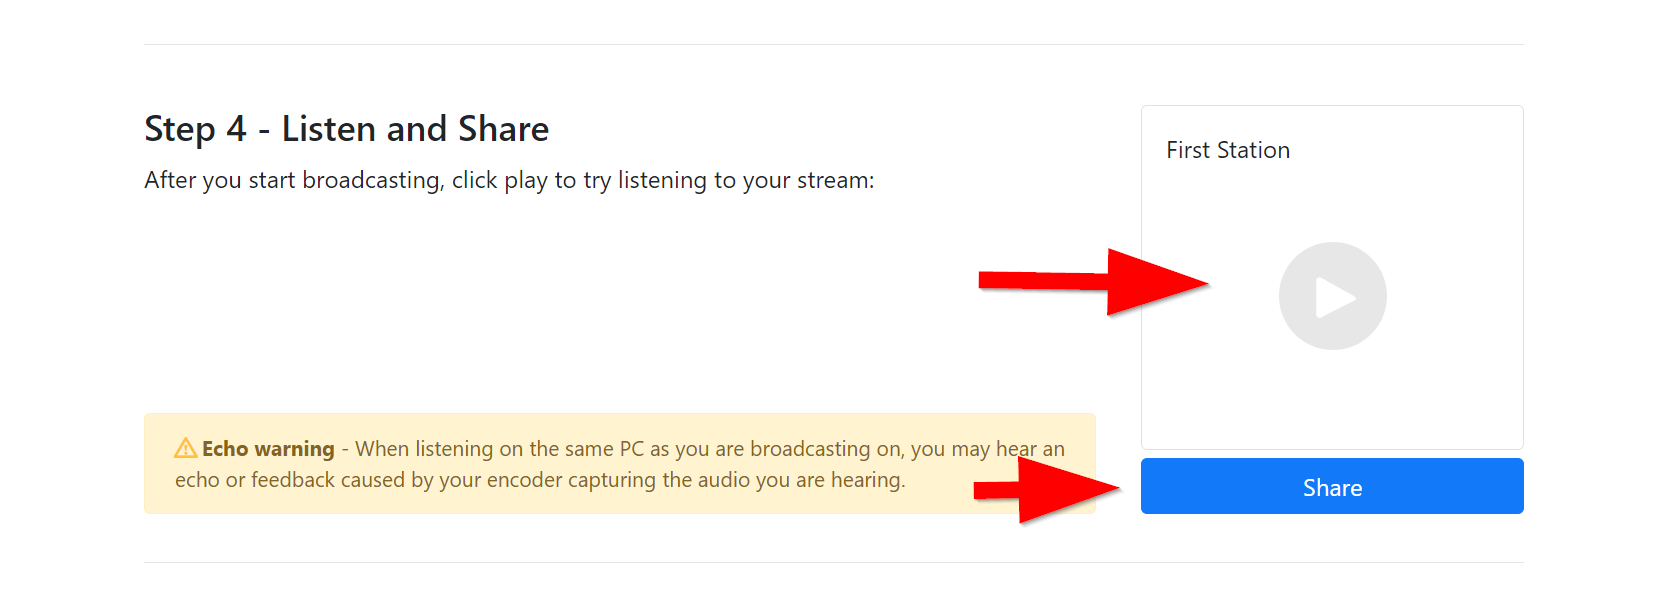
Click the "Share" button to see the HTML code for the player, which you can paste into your website to embed your stream on it. You will also see the "Direct Stream URL", which can be used in media players like VLC or used inside mobile apps.
What's next?
Click "Go to Dashboard" to view the main Radio Mast dashboard for your account. From here, you can explore the rest of the platform and customize your stream.
To configure your stream, click "Streams" in the navigation bar on the left, then click the name of your stream, then click the "Configuration" tab. This page will allow you to customize your stream capacity, monitoring, geo-blocking, and more.
If you wish to view the HTML code for the embedding your player again, you can do so by clicking the name of your stream and looking under the "Overview" tab.
If you're launching a new online radio station, we recommend enabling "Promotion" in the "Configuration" tab, which will publish your stream to the Icecast and Shoutcast stream directories and help new listeners find your stream.
If you'd like to improve the sound quality of your stream, upgrade to Rocket Broadcaster Pro. With Rocket Broadcaster Pro, you can increase the bitrate of your stream and use a better audio codec like AAC or AAC+, both of which will boost the audio quality of your stream.
Questions?
If you have any questions about streaming online or had trouble with this guide, please get in touch!