API Quickstart Guide
Before we begin, you'll need to get your API key:
- Sign up for a Radio Mast account if you don't yet have one.
- After logging in, click Account then API Keys or visit this page to view your API key.
To make learning easier, the API has a browseable HTML interface. We recommend keeping this handy in case you get stuck or want to experiment easily.
In this guide, we'll cover the basics of using the Radio Mast API, including how to create a radio station and radio stream. At the end, you'll be able to connect a streaming audio encoder to your newly created stream and start broadcasting live audio.
Creating a Radio Station
A "Radio Station" in Radio Mast allows you to group resources related to a single station, to keep things organized. It is the parent of most resources, so we'll need to create one as a first step.
To create a Radio Station, make a POST request to /v1/radiostations/ and pass in a name field, remembering
to replace <your-token> with your API key:
curl -X POST -H "Authorization: Token <your-token>" https://api.radiomast.io/v1/radiostations/ -d name="My Radio Station"

{
    "name": "My Radio Station",
    "uuid": "89fdf652-95a3-4b72-9bf6-6224ab61bd2a"
}
import requests
import pprint

resp = requests.post("https://api.radiomast.io/v1/radiostations/", headers={'Authorization': "Token <your-token>"},
                     json={'name': 'My Radio Station'})
pprint.pprint(resp.json())

{'name': 'My Radio Station', 'uuid': 'b4f98161-6341-4f5e-a677-12a6455c3321'}
The response is a JSON-encoded representation of the station we just created. The uuid is a unique identifier for this
station, and we'll want to keep that handy as we'll need it in the next step.
Creating a Radio Stream
Now that we've created a station, we can create a radio stream. There are two types of streams in the Radio Mast API:
- Radio Mast Streams - These are audio streams hosted on the Radio Mast Streaming Network and have full capabilities.
- External Streams - These are audio streams hosted elsewhere. Fewer options are available for these streams, but they can still be monitored or used with transcoders.
Let's create a Radio Mast stream, so that we can connect a streaming audio encoder to it and start broadcasting. At the end, we'll get a shareable public listening URL that our audience can use to listen to the stream.
The following fields are required when creating a Radio Mast stream:
station- The UUID of a Radio Station to organize this stream undername- A nickname for this Radio Stream.listener_capacity_pool- The UUID of the Listener Capacity Pool that this stream should use. The maximum simultaneous listeners allowed on the stream will be shared with the capacity of the pool. If you do not specify this field, it will default to the first Listener Capacity Pool on your account (for backwards compatibility).
Before we create the stream, visit this link to use the Browseable API to find the UUID of a Listener Capacity Pool on your account. You should see
a uuid field listed there.
To create the stream, run the following code, making sure to replace <your-pool-uuid> and <your-token>:
curl -X POST -H "Authorization: Token <your-token>" https://api.radiomast.io/v1/radiostreams/radiomast/ -d name="MP3 Stream" -d station="b4f98161-6341-4f5e-a677-12a6455c3321" -d listener_capacity_pool="<your-pool-uuid>"

{
  "uuid": "355ab84d-d2b2-4dd5-90f2-372befc49547",
  "station": "b4f98161-6341-4f5e-a677-12a6455c3321",
  "name": "MP3 Stream",
  "username": "source",
  "password": "<removed>",
  "mount": "355ab84d-d2b2-4dd5-90f2-372befc49547",
  "listening_url": "https://streams.radiomast.io/355ab84d-d2b2-4dd5-90f2-372befc49547",
  "streaming_plan": "pooled-1",
  "analytics_plan": null,
  "listener_capacity_pool": "7316cd82-2daf-4a06-9851-47d498406c26",
  "audio_parameters": {
    "codec": "MP3",
    "bitrate": 128,
    "channels": 2,
    "samplerate": 44100
  },
  "monitoring": {
    "plan": null,
    "enabled": false,
    "silence_detection": false,
    "status": "Pending",
    "uptime_24_hours": "N/A",
    "uptime_7_days": "N/A",
    "uptime_30_days": "N/A",
    "last_tested_at": null,
    "silence_threshold_db": -60,
    "silence_duration": 15
  },
 "listener_count": 0
}
import requests
import pprint

resp = requests.post("https://api.radiomast.io/v1/radiostreams/radiomast/", headers={'Authorization': "Token <your-token>"},
                     json={'station': 'b4f98161-6341-4f5e-a677-12a6455c3321', 'name': 'MP3 Stream', 'listener_capacity_pool': '<your-pool-uuid>'})
pprint.pprint(resp.json())

Output:
{u'audio_parameters': {u'bitrate': 64,
                       u'channels': 2,
                       u'codec': u'MP3',
                       u'samplerate': 44100},
 u'listening_url': u'https://streams.radiomast.io/355ab84d-d2b2-4dd5-90f2-372befc49547',
 u'monitoring': {u'enabled': False,
                 u'last_tested_at': None,
                 u'plan': None,
                 u'silence_detection': False,
                 u'silence_duration': 15,
                 u'silence_threshold_db': -60,
                 u'status': u'Pending',
                 u'uptime_24_hours': u'N/A',
                 u'uptime_30_days': u'N/A',
                 u'uptime_7_days': u'N/A'},
 u'mount': u'355ab84d-d2b2-4dd5-90f2-372befc49547',
 u'name': u'MP3 Stream',
 u'password': u'<removed>',
 u'station': u'b4f98161-6341-4f5e-a677-12a6455c3321',
 u'streaming_plan': u'pooled-1',
 u'analytics_plan': None,
 u'listener_capacity_pool': u'7316cd82-2daf-4a06-9851-47d498406c26',
 u'username': u'source',
 u'listener_count': 0,
 u'uuid': u'355ab84d-d2b2-4dd5-90f2-372befc49547'}
The response contains a JSON representation of our newly created Radio Stream. For now, here's the fields you need to know:
username- The username for connecting a streaming audio encoder to this stream.password- The password for connecting a streaming audio encoder to this stream.mount- The "mount" for connecting a streaming audio encoder to this stream. For some encoders, you should prepend a slash to this value.listening_url- This is the public link you should use to listen to your stream, and can be shared with your audience.audio_parameters- This contains the auto-detected parameters from your encoder when you connect. If you haven't connected an encoder yet, it defaults to recommended values based on yourstreaming_plan.monitoring- This dictionary contains settings related to stream monitoring. We'll cover this in a separate article on Monitoring.listener_count- The number of listeners currently listening to the stream.
Broadcasting to your Radio Stream
Now that we've created a Radio Stream and received the credentials for it, let's try connecting and broadcasting to the stream.
To receive audio from broadcasters, the Radio Mast Streaming Network uses the Icecast (or Icecast 2) source protocol. This protocol is supported by dozens of software applications and hardware devices, which are compatible with Radio Mast.
We'll show you how to configure our streaming audio encoder, Rocket Broadcaster to connect to Radio Mast:
- Download and install Rocket Broadcaster. The free edition will work for this guide.
- Run Rocket Broadcaster, and in the menu at the top, click on Broadcast then Streams...
-
Fill out the streams dialog with the credentials you received from the API:
- Name - Choose a nickname for the stream.
- Server Type:
Icecast 2 - Hostname or IP: Choose an ingest server that's closest to you. If in doubt, use
ingest-yyz.radiomast.io. - Port:
8000 - Mount: Use what was provided by the API response in the previous step.
- Username: Use what was provided by the API response in the previous step (typically just
source) - Password: Use what was provided by the API response in the previous step.
- Network Interface:
Default - Audio Codec:
MP3 (Low Quality)
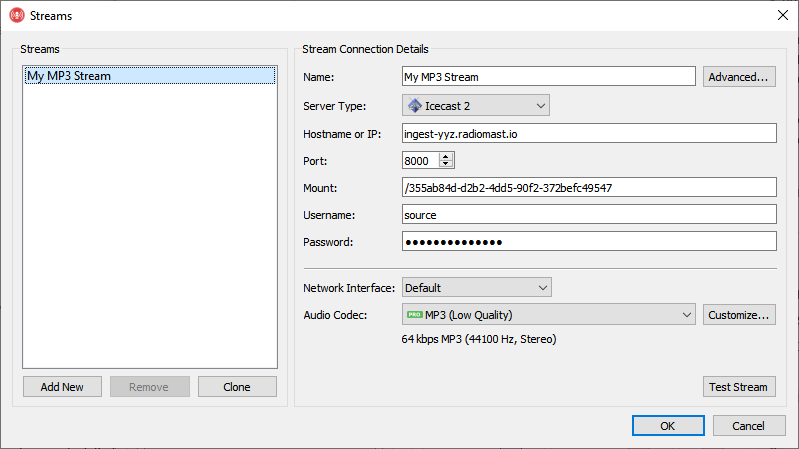
Stream settings in Rocket Broadcaster, configured to broadcast to Radio Mast. -
Click the "Test Stream" button to run a diagnostic test. If it passed, you've entered everything correctly and you can start streaming. Click OK to proceed back to the main window. If it failed, double check that you've entered all the stream credentials correctly.
-
Back in the main window, click "Start Broadcast" to begin broadcasting live.
You can now try visiting the listen_url in your web browser or a media player like VLC. You should hear any audio
captured by Rocket Broadcaster.
For more information on configuring Rocket Broadcaster, please see the Rocket Broadcaster documentation.